The following procedures are complementary and can be performed ad-hoc.
Pairing your Jabra personal devices in Jabra Plus Desktop#
To connect your wireless Jabra personal device to the Jabra Plus Management platform, you must install the Jabra Link Bluetooth adapter and pair it with your device. If your device comes with a Bluetooth adapter (USB-A/USB-C), end users must pair it using the app, unless it is pre-paired from the factory.
Be aware that for non-DECT, wired Jabra personal devices (e.g.: Jabra Evolve2 50) you do not have to perform the procedure that follows, as the app automatically detects wired personal devices.
Important note
For Jabra’s DECT personal devices, all Jabra Engage DECT headsets come pre-paired from the factory. However, if you must pair them again, or you did not buy the headset as a bundle, you must pair them using Jabra Direct.
As a prerequisite, ensure you have first installed Jabra Plus Desktop on the end user´s computer where you are going to pair your personal device and adapter to.
To pair your Jabra Link Bluetooth adapter (i.e.: Jabra Link 370, 380, 390 and variants) and Jabra wireless personal device (Bluetooth device):
- Insert the Jabra Link Bluetooth adapter into a USB port on your computer and ensure the Jabra personal device is switched ON and within range
- Put your Jabra personal device in pairing mode. (See the relevant Jabra personal device’s manual for instructions on how to do this)
- On your Windows system tray, right click Jabra Plus Desktop and click Pairing
When the Jabra Plus Desktop app detects your Jabra Link Bluetooth adapter, it searches for your Jabra personal device. When detected, in the Available devices dialog box, click the Jabra personal device you would like to pair. When pairing is successful, you see a Device connected message.
The Jabra personal device is now paired and can now be managed remotely in the Jabra Plus Management platform.
Firmware version dependencies – PanaCast 50 VBS#
On the one hand, depending on the firmware version installed on your PanaCast 50 VBS, provisioning it to the Jabra Plus Management platform may require a factory reset. This may be the case if you have already installed the PanaCast 50 VBS and kept an older firmware, and you would now like to provision it to the platform.
During the installation process, when prompted, it is recommended that you update the firmware on your PanaCast 50 VBS. On the other hand, if this is the first time you are provisioning PanaCast 50 VBS to the platform, then you must perform the provisioning procedure.
If you had already installed the PanaCast 50 VBS and would now like to provision it to the platform:
In the Touchscreen tablet, in the Account menu, on the Access tab, in the Link with organization in Jabra Plus Management section, tap Link and enter a provisioning code
a. Alternatively, in the Web Console, in the Account menu, on the Access tab, in the Enrolment to Jabra Plus Management section, click Link and enter a provisioning code
If the linking option is unavailable, perform a firmware update using one of the methods that is not Jabra Plus. For the procedure for performing a firmware update, see the documentation for the PanaCast 50 VBS.
If you cannot perform a firmware update, perform a factory reset on your PanaCast 50 VBS. For the procedure for performing a factory reset, see the documentation for the Jabra meeting room device.
Perform the provisioning procedure and ensure that you update the firmware of your PanaCast 50 VBS
After following the provisioning procedure and the firmware update, your PanaCast 50 VBS appears in the Jabra Plus Management platform in the room inventory.
Remote provisioning – PanaCast 40/50/55 VBS and U30#
This procedure assumes that you are not physically present where the Jabra meeting room devices are located, however, you must be connected to the same network.
Important note
The PanaCast U30 meeting room device can also be provisioned remotely following the same procedure, however, be aware that for Wi-Fi connection there is an extra step. For ethernet connection, you can perform the procedure that follows.
- Ensure the PanaCast 40/50/55 VBS or PanaCast U30 video bar is plugged in and powered ON at the remote location. In the splash screen that appears, ensure you note down the IP address and last six digits of the video bar’s serial number.
- On a computer connected to the same network as the meeting room device, launch a Google Chrome web browser, and in the URL field, enter the IP address of the meeting room device, i.e.: http://192.168.x.x and hit the Enter key
- When you see a Your connection is not private screen on your browser, ensure you click Proceed to [IP address] (unsafe)
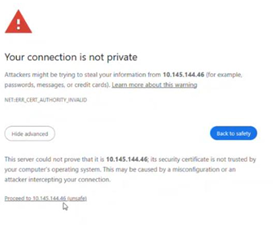
- In the Web Console screen, in the Username field, enter admin, and in the Password field, enter the last six-digits of the meeting room device and then click Log in. For the PanaCast U30, you are prompted to create a new password. Then click Save.
At this point, you can follow the provisioning procedure as if you were physically present in the meeting room. For users of PanaCast U30, you can follow the normal provisioning procedure.
Troubleshooting#
| Problem | Solution |
|---|---|
| I created and installed a software client, but my Jabra device (Meeting room or Personal device) does not appear in the room inventory or device inventory | - If the Jabra meeting room or personal device is not visible in the relevant inventory, the end user must restart the computer that the Jabra device is connected to. |
| When provisioning, the application says the organization/room provisioning code has expired, and I cannot continue | - Contact an admin user in the relevant organization, or if you are an admin user and have the necessary access rights for the Jabra Plus Management platform, you can generate either a new organization / room provisioning code and retry. |
| After entering the organization/room provisioning code, the Jabra Plus Provisioning app tells me it cannot connect to Jabra Plus Management platform | - Ensure you check the Internet connection on your provisioning computer and then retry. |
| During provisioning, the firmware update failed or stopped responding/got stuck | - Ensure you unplug the Jabra meeting room device from the power supply/power outlet and plug it back in. You can now retry the firmware installation. |
| When I launch the Jabra Plus Desktop client, I see a Something unexpected happened error / During installation of the Jabra Plus Desktop client, the Installation Wizard prompts me to install the Microsoft Edge Webview2 Runtime component | - Ensure you read the Important note in the Provisioning Jabra personal devices topic. |
| During provisioning of a Jabra Scheduler I mistakenly selected “Control IP” instead of ”Jabra Scheduler” and now I cannot continue with the provisioning. | - You must factory reset the Jabra Scheduler and retry provisioning. For guidance, see the Jabra device documentation. |
If you require further assistance, would like to get in touch with Jabra, or consult other documentation, ensure you visit the Jabra Plus support page.