Jabra Plus software clients are mandatory for provisioning and connecting Jabra devices to the Jabra Plus Management platform.
For Jabra personal devices, the Windows-only software client – Jabra Plus Desktop – is also an app that lets end users perform firmware updates, when prompted.
For Jabra meeting room devices, the software clients can be divided into two categories:
- Room client
- Built-in client
On the one hand, certain Jabra meeting room devices and peripherals (e.g. Jabra PanaCast 40/50/55 VBS, PanaCast U30, Jabra Scheduler) ship from the factory with built-in software clients and a user interface that require provisioning code(s) to link with the platform.
On the other hand, the meeting room device without a pre-installed user interface (i.e.: Jabra PanaCast 50 BYOD) requires the Jabra Plus Provisioning app and a provisioning code.
Provisioning codes are 12-digit alphanumeric codes used to link or connect Jabra meeting room devices to an organization or room in the Jabra Plus Management platform. Admin users can generate the following two types of provisioning codes:
A. Organization provisioning code: requires manual naming of the Jabra meeting room device (i.e. the name of the meeting room) during provisioning
- Meeting room device appears as an unassigned room in the room inventory, allowing an admin user to drag and drop the meeting room device into a location, and then configure firmware policy, settings, etc. By default, the meeting room device has the Standard Room Configuration assigned to it
B. Room provisioning code: adds the Jabra meeting room device (or relevant peripheral) to a previously designated room in the platform
- Meeting room device appears in a predetermined location in the room inventory, with or without a previously created configuration or firmware policy assigned to it
You can read more about software clients and provisioning codes in the Jabra Plus Management platform – An Administrator’s Guide.
The following table describes the Jabra device type and the respective software client it uses.
| Jabra device type or model | Software client for provisioning |
|---|---|
| Jabra personal devices | Jabra Plus Desktop software client (Desktop client) |
| Jabra PanaCast 50 Room System (RS) Microsoft Teams Rooms / Zoom Rooms | Room client |
| Jabra PanaCast 40/50/55 Video Bar System (VBS) and PanaCast U30 | Built-in software client and either organization or room provisioning code |
| Jabra PanaCast 50 – Bring Your Own Device (BYOD) | Built-in software client and either organization or room provisioning code using the Jabra Plus Provisioning app |
| Jabra Scheduler | Built-in software client and provisioned using a room provisioning code |
Be aware that the Jabra Plus Desktop software client (Desktop client), and the room client can be deployed silently, without any User Interface (UI) visible during the installation process. Also, using the parameters that follow, the system tray icon can be hidden, while it is running.
Important note
Before performing any of the provisioning procedures, it is mandatory that an admin user has already created an organization in the Jabra Plus Management platform.
Software client mass deployment option
An admin user can also perform the software client installation in a mass deployment context, although this is only possible for all Jabra personal devices and the PanaCast 50 RS meeting room device.
In a mass deployment scenario, specifically for Jabra Plus Desktop (to provision Jabra personal devices), the relevant software client must be deployed and installed on every end user’s Windows® computer.
For Jabra meeting room devices, you can deploy the room client to every ThinkSmart™ Core/meeting room computer connected to Jabra meeting room devices.
Note
Meeting room computer includes any certified Microsoft Teams Rooms (MTR) or Zoom Rooms (ZR) computer (Windows PC with a screen/interface) that is permanently connected to the Jabra PanaCast 50.
For example, suppose in 10 physical meeting rooms, every room has one PanaCast 50 RS with a meeting room computer connected to it. In this case, the same *.msi file is distributed and installed on each of the meeting room computers.
Important note
Mass deployment is possible with the PanaCast 50 RS meeting room device and all Jabra personal devices only.
Mass deployment is not possible with Jabra meeting room devices that have a built-in software client, i.e. PanaCast 40/50/55 VBS and PanaCast U30.
Also, mass deployment is not possible with meeting room devices that are provisioned using the Jabra Plus Provisioning app i.e.: PanaCast 50 BYOD.
The following are suggested ways of installing the room client and Jabra Plus Desktop:
Perform a manual installation on every individual computer with the relevant Jabra device connected to it, especially if only a few Jabra devices require provisioning
or
Mass deploy the *.msi file using a preferred method, for example, via group policy, script, or silent installation, etc. This might be the case if there is a larger number of Jabra devices to provision
In the context of the room client and Jabra Plus Desktop software client, you can use Microsoft’s System Center Configuration Manager or Microsoft PowerShell 7 or later and customize the installation of the clients with the following parameters when installing from the command line:
| Parameter | Values | Description |
|---|---|---|
| ALLUSERS | 1 | When set to 1, installs the client for all Windows users on the computer (local administrator rights required). |
| NO_TRAYICON | YES/NO | The software client does not have a tray icon while it is running. |
| /qn | —- | Runs a silent installation (no UI during installation). |
| NOAUTOUPDATE | YES/NO | Default: NO. If set to YES, automatic updates do not take place. |
| DISABLE_AUTOSTART | YES/NO | Default: NO. If set to YES, it prevents the client from starting automatically after installation (for example, when installing remotely on a computer without an active user session). |
An example of a typical silent installation where the client does not have a tray icon while running is as follows:
msiexec /i <path to package> /qn NO_TRAYICON=YES
Jabra Plus Desktop installation options
The Jabra Plus Desktop installer provides two options, Automatic updates and Install for all users, which affects how the app runs and how it is maintained on Windows computers. Both options are set during installation and cannot be changed later — if you need to change them, you must uninstall Jabra Plus Desktop and reinstall it with the desired settings.
- Automatic updates option
For Jabra Plus Desktop, enterprise IT administrators can enable or disable automatic updates. By default, the application updates whenever a new version is released. To force the app not to update itself, ensure you use the NOAUTOUPDATE=YES parameter or clear the checkbox during installation.
- Install for all users (per computer) option
The Install for all users checkbox controls whether Jabra Plus Desktop is installed only for the current Windows user (per user) or for all users on the computer (per computer).
When the checkbox is cleared or ALLUSERS parameter is not set, the app is installed only for the Windows account that runs the installer, in that user’s profile, and can be installed and run without local administrator privileges.
The current user (per user) installation folder is the following:
C:\Users\{your-windows-username}\AppData\Local\Programs\Jabra\Jabra Plus Gateway
Note
When the checkbox is cleared or ALLUSERS parameter is not set, it is not recommended to start the Jabra Plus Desktop installation using an account with elevated privileges i.e.: Administrator account, as later updates or uninstallation under a different account may leave leftover files or installer data and cause installation or maintenance problems.
When the checkbox is selected (or ALLUSERS=1 parameter is used), Jabra Plus Desktop is installed in the
C:\Program Files (x86)\Jabra\Jabra Plus Gatewayfolder and is available to all Windows user accounts on the computer; enterprise IT administrators typically use this option to deploy a single, per computer installation that is accessible to all users on managed Windows computers.
Proxy server settings
Jabra Plus Desktop and room client support and use Windows proxy server settings automatically when connecting to the platform.
However, in the case of meeting room devices with built-in software clients i.e. PanaCast 40/50/55 VBS and PanaCast U30, you can manually configure proxy server settings in the pre-installed user interface. In the case of PanaCast 50 BYOD, proxy server settings can be configured in the Jabra Plus Provisioning app.
Important note
The Jabra Plus desktop client and room client cannot be installed on the same computer.
Provisioning Jabra personal devices#
Jabra headsets, headphones and conference speakerphones must be provisioned using Jabra Plus Desktop — a Windows®‑only desktop app that connects personal devices to the Jabra Plus Management platform.
An AV Installer or admin generates and downloads the Microsoft Installer package (*.msi) file for the organization directly from Jabra Plus Management and deploys it to end users by their preferred distribution method.
After installation, the Jabra Plus Desktop app runs from the Windows system tray.
Be aware of the following considerations when installing Jabra Plus Desktop:
- Mass deployment: See the Software client installation & device provisioning chapter for guidance
- Exclusive to organizations: Admin users must generate or create and then download Jabra Plus Desktop directly from the platform and deploy it on all end users’ computers. The desktop app is exclusive to an organization
- End user system requirement: Ensure that the end user’s computer where you run Jabra Plus Desktop software client is a PC running Windows 10 or later
- Browser requirement: Regardless of the web browser you are using, you must download and install Microsoft Edge Webview2 Runtime, as this is a required component for the correct functioning of the software client
Important note
Microsoft Edge Webview2 Runtime allows embedding web content in native applications. If you installed Jabra Plus Desktop via a PowerShell script and encountered a Something unexpected happened error, ensure you install the Microsoft Webview2 Runtime to fix it.
If you use the *.msi file, the Installation Wizard prompts you to download the component if it’s missing—click Yes to install it.
Be aware that Windows 10 may not have the component pre-installed, especially older versions, while Windows 11 does. However, if you still face the error on Windows 11, the component might have been uninstalled.
In either case, ensure you download and install the Microsoft Edge Webview2 Runtime component and restart your computer.
Deploying and installing Jabra Plus Desktop client#
Installing the Jabra Plus Desktop client is a prerequisite for an admin user to manage Jabra personal devices in the platform.
After installation and depending on the Jabra personal device(s) you are provisioning, as a concluding step, you may have to pair it to the Bluetooth adapter, unless it is already pre-paired or unless you have a wired or cabled Jabra personal device, in which case you do not have to pair it.
Note
If you must reinstall or delete Jabra Plus Desktop, ensure that you do so using Add or remove programs within Windows®.
To deploy and install Jabra Plus Desktop:
On the Windows computer where the Jabra personal device is connected to, run the *.msi file, follow the Installation Wizard, and install it. After installation, ensure you restart the end user’s computer(s).
Jabra personal devices are now added and appear in the device inventory and can be managed by admin users in the Jabra Plus Management platform.
(Optional) If you added or provisioned a Jabra wireless personal device with a Bluetooth adapter:
- If your end users have a wireless Jabra personal device that comes with a Bluetooth adapter (USB-A/USB-C), they must pair it using the Jabra Plus Desktop app, if it is not pre-paired from the factory. For the procedures on how to pair, and to finish provisioning, see the Pairing your Jabra personal devices in Jabra Plus Desktop topic. After pairing and restarting the computer, your Jabra personal device is onboarded to Jabra Plus Management.
Note
Be aware that if end users have a non-DECT, wired Jabra personal device, it is unnecessary to follow this concluding step.
At this point, see End of device provisioning - Next steps in Jabra Plus Management platform.
Provisioning Jabra meeting room devices and peripherals#
The following links provide quick access to the relevant provisioning procedures:
- Jabra PanaCast U30
- Jabra PanaCast 40/50/55 VBS
- Jabra PanaCast 50 BYOD
- Jabra PanaCast 50 RS
- Jabra Scheduler
Note
The Jabra PanaCast 20 video camera must be provisioned as a personal device, and not as a meeting room device.
To finalize the configuration and set how Jabra devices interact with the platform, see End of device provisioning - Next steps in Jabra Plus Management platform.
Jabra PanaCast U30#
To connect or link the Jabra PanaCast U30 to the Jabra Plus Management platform, an admin user (owner or member with edit rights) must choose the installation approach and get an organization or room provisioning code from the platform.
The IT admin-generated provisioning or room code lets you link the PanaCast U30 in a physical meeting room to an organization in Jabra Plus Management. This requires familiarity with meeting room naming conventions, as during provisioning you are prompted to enter a room name.
Before you begin with provisioning, it is important that you meet the following prerequisites:
- An admin user in Jabra Plus Management must obtain the organization´s 12-digit organization provisioning code or room provisioning code to generate it
- Have a computer with an active Internet connection and Google Chrome web browser
- An Ethernet or a Wi-Fi connection
- When using a Wi-Fi connection, make sure you have a mobile phone with a screen that can display QR codes.
Note
Provisioning codes are valid for 14 days from the day they are generated by an admin user (owners or members with edit rights).
If you get a Code has expired error message, ensure you obtain a new provisioning code before continuing.
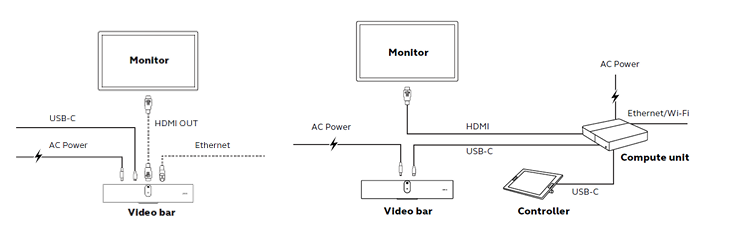
The illustration represents a suggested connection option.
The illustration on the left shows the default connection and the one on the right an optional connection using a Touch Controller.
Provisioning PanaCast U30 to Jabra Plus Management#
To provision the PanaCast U30:
Part 1: Connecting to your network
- Connect an HDMI cable from the meeting room device to a touchscreen monitor, display or TV, power it on and let it boot up
- In the initial Jabra setup screen, decide whether you would like to use Wi-Fi or an Ethernet connection
a. For Ethernet connection, you must connect an Ethernet cable to the meeting room device
b. For Wi-Fi connection, you must generate a QR code on your mobile phone. For instructions on how to generate a QR code see the following video for iPhone or Android.
- When you have generated the QR code, place the phone displaying the code in front of the meeting room device camera until the camera scans the code. This connects the meeting room device to your Wi-Fi connection.
- When the meeting room device is connected to your network, in the Setup wizard section, ensure you note down the IP address of the meeting room device, and in the Default credentials section ensure you note down the Username (default username: admin) and Password (default password: the last six digits of the meeting room device’s serial number).

- To open the Web Console, on a computer connected to the same network as the meeting room device, launch a Google Chrome web browser, and in the URL field, enter the IP address of your meeting room device (step 3), e.g., http://192.168.x.x and hit Enter
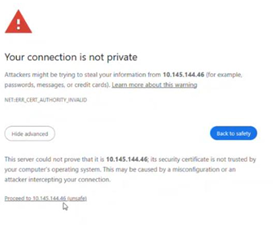
- At this point, if you see a Your connection is not private screen on your browser, ensure you click Proceed to [IP address] (unsafe)
Part 2: Web Console
- In the Web Console page, in the Username field, enter admin, and in the Password field, enter the last six-digits of the serial number of the meeting room device (Step 3 of Part 1 procedure) and then click Log in
- You are now prompted to create a new password. Ensure you note it down, and then click Save
- Enter the username and the newly created password. Click Log in.
- In the Setup of PanaCast U30 screen, you can change language, time zone, and NTP server settings. When you are finished, click Next.
Note
If you find an NTP Server is not reachable error, ensure you configure your NTP server.
- Ensure you accept the Privacy Policy and End User License Agreement. Click Accept for both. Then do the same for the Microsoft privacy policy.
- In the Network page, you can optionally configure a proxy server. When you are finished, click Next.
Part 3: Linking with Jabra Plus Management
- In the Link with organization in Jabra Plus Management screen, click Start
- In the Enter provisioning code screen, enter either the 12-digit alphanumeric organization or room provisioning code. At this point, the system looks for your organization, and when it finds it, click Confirm.
- If you entered the organization provisioning code in the previous step, you must manually enter the name of the meeting room where the meeting room device is located. If you entered a room provisioning code in step two, the name of the meeting room is displayed automatically, as it was predetermined by an admin user in Jabra Plus Management.
- In the Enter the name of the meeting room dialog, enter the name of the meeting room, for example Meeting Room 1, and then click Next
- In the Linked with [your organization name] dialog, click OK
- In the Linked with Jabra Plus Management page, click Next
- In the Summary screen, click Confirm.
At this point, your PanaCast U30 appears in Jabra Plus Management, in the Room inventory menu item.
Jabra PanaCast 40/50/55 VBS#
The Jabra PanaCast 40, 50, and 55 Video Bar Systems (VBS) come in two variants: an all-in-one variant, bundled with the Jabra PanaCast Control (touchscreen tablet or touch controller), and a video bar-only variant, requiring your own screen and peripherals. Additionally, the PanaCast 55 VBS is compatible with Huddly® cameras and PanaCast SpeakerMic extension device.
Both variants include built-in software clients with a user interface. To connect or link the meeting room device to Jabra Plus Management, an admin user (owner or member with edit rights) must choose the installation approach and provide either the organization provisioning code or room provisioning code. The latter requires familiarity with meeting room naming conventions, as you are prompted to enter a room name during provisioning.
Before you begin with provisioning, it is important that you meet the following prerequisites:
- An admin user in Jabra Plus Management must obtain the organization´s 12-digit organization provisioning code or room provisioning code to generate it
- Have a computer with an active Internet connection and Google Chrome web browser
- An Ethernet or a Wi-Fi connection
Note
Provisioning codes are valid for 14 days from the day they are generated by an admin user (owners or members with edit rights).
If you get a Code has expired error message, ensure you obtain a new provisioning code before continuing.
PanaCast 40/50/55 VBS – all-in-one
Provisioning of the all-in-one variant of the PanaCast 40/50/55 VBS takes place through the Jabra PanaCast Control touchscreen with an active Internet connection. This variant comes pre-paired with the touchscreen from the factory, but if pairing is lost, or you purchased the video bar and PanaCast Control separately, manual pairing is required prior to provisioning. To do so, see the PanaCast 40/50/55 VBS documentation.
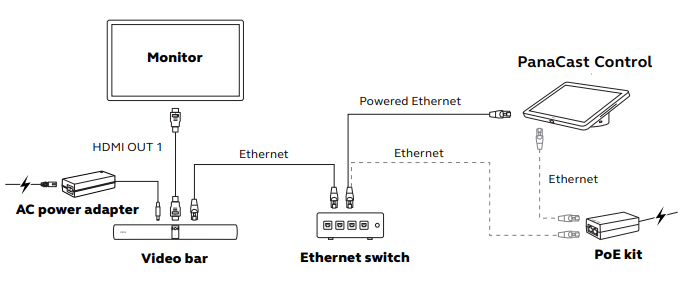
The illustration represents a suggested connection option.
PanaCast 40/50/55 VBS – bar only
The PanaCast 40/50/55 VBS – bar only variant requires you to connect an external touchscreen or monitor via HDMI, and peripherals such as a USB mouse or keyboard to the back of the meeting room device.
However, the PanaCast 40 VBS has one USB-A port for connecting a keyboard or mouse, with a virtual keyboard available for menu navigation. For increased flexibility, you can connect a USB hub to the USB-A port.
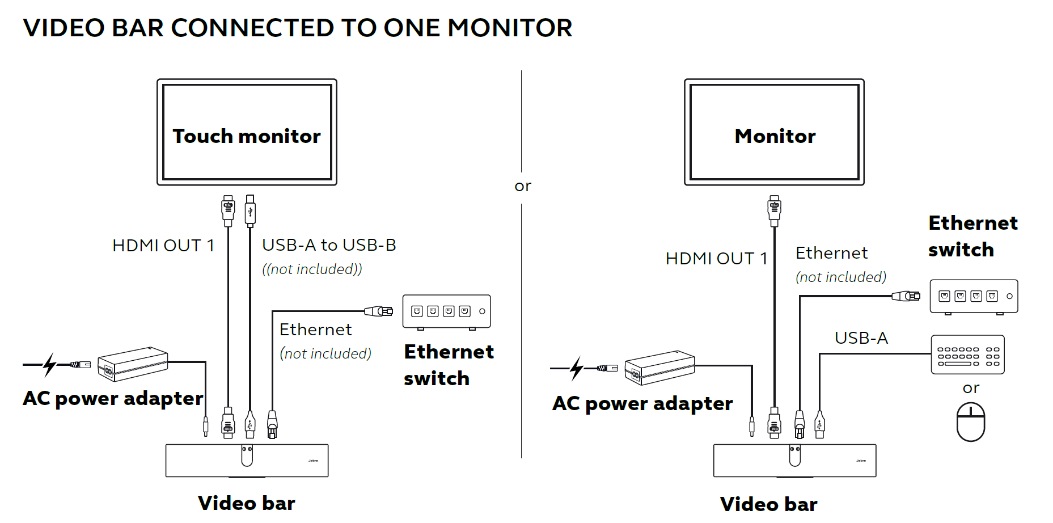
The illustration represents two suggested connection options.
Both meeting room device variants (all-in-one or bar only) can be provisioned as Microsoft Teams Rooms (MTR), Zoom Rooms (ZR), or BYOD setup, and you must select the desired video service provider (i.e.: MTR, ZR, BYOD) during provisioning. For MTR or ZR setups, you must also have access to a computer with Internet access.
Be aware that changing the video service provider requires re-provisioning the Jabra meeting room device to the platform.
When connecting through Ethernet, you can use MDS, EAP/TLS, and MSCHAPv2 authentication, as well as using a certificate or using the 802.1x protocol, among other settings.
Important note
The PanaCast 50 VBS requires the latest firmware updates before provisioning. On the one hand, if your PanaCast 50 VBS is already installed or in-use with older firmware, you must update it; for guidance, refer to the Firmware version dependencies –PanaCast 50 VBS topic.
On the other hand, if your PanaCast 50 VBS is already running a newer or the latest firmware, then you can continue with provisioning.
Provisioning PanaCast 40/50/55 VBS all-in-one or bar only to Jabra Plus Management#
To provision a PanaCast 40/50/55 VBS all-in-one or bar only:
Power on the Jabra meeting room device, let it boot up, and connect the Ethernet cable from the PanaCast 40/50/55 VBS to a router or network port
If you do not have to configure Internet and network settings, click or tap Continue on this device. Otherwise, if you must configure your network or Wi-Fi access, after the initial Jabra splash screen, click or tap Ethernet settings or Wi-Fi settings and change settings as desired.
a. Wi-Fi:
- Ensure you first disconnect or unplug the Ethernet cable from your PanaCast 40/50/55 VBS, and on the lower right-hand side of the screen, click Wi-Fi settings and enter your Wi-Fi network’s credentials
b. Ethernet:
- Ensure the ethernet cable is plugged in on your PanaCast 40/50/55 VBS, and on the lower right-hand side of the screen, click Ethernet settings
Select the interface language, and then tap or click Next . Ensure you accept the Privacy policy and License Agreement
On the Select the device type for the touch controller screen, click or tap the relevant device, i.e.: Jabra Control IP (PanaCast Control touchscreen tablet or controller), and then click Next. At this point, the PanaCast 40/50/55 VBS checks your Internet connection.
For PanaCast 40/50/55 VBS all-in-one: The video bar automatically pairs the Touch controller to the video bar.
- For PanaCast 40/50/55 VBS bar only: You see a message that the video bar cannot be paired with a Touch controller. Ensure you click Continue on this device.
On the Date and time screen, to change the time, click Change, otherwise click or tap Next
- At this point, you may be asked to update the firmware of your PanaCast 40/50/55 VBS. If so, click Update
In the Link with organization in Jabra Plus Management screen, click or tap Start
In the Enter provisioning code screen, enter either the 12-digit alphanumeric organization or room provisioning code. At this point, the system looks for your organization, and when it finds it, click or tap Confirm.
If you entered the organization provisioning code in the previous step, you must manually enter the name of the meeting room:
Tip
The name you give to the meeting room is also the name of the Jabra device (i.e.: PanaCast 40/50/55 VBS all-in-one or bar only) and the name appears in the organization´s room inventory in the platform, as an unassigned room .
Therefore, it is useful to know the naming conventions of the physical rooms in your organization, for example, Meeting Room 1 or Conference room B , and you do not have to change them later in the platform.
A. In the Enter the name of the meeting room dialog box, enter the name of the meeting room, for example Meeting Room 1, and then click or tap Next
B. Otherwise, if you entered a room provisioning code in step eight, the name of the meeting room is displayed automatically, as it was predetermined by an admin user in the platform
At this point, your meeting room device appears in Jabra Plus Management, in the Room inventory menu item. To complete the provisioning, you must choose a video service provider.
Choosing a video service provider
In the Select room type screen, click or tap to select the desired video service provider (MTR, ZR or BYOD), and then click Next
- Depending on your choice of video service provider i.e.: MTR or ZR, you may be asked to provide a pairing code to link or connect the video service provider to your Jabra meeting room device. To do this, ensure you follow the on-screen instructions. If you choose BYOD, your meeting room device installation is complete.
After provisioning the Jabra meeting room device(s), see End of device provisioning – Next steps in Jabra Plus Management platform.
Jabra PanaCast 50 – BYOD#
When you provision the PanaCast 50 in a BYOD setup, you must download the Jabra Plus Provisioning app and the organization or room provisioning code to connect the Jabra meeting room device, which has a built-in client, to the platform.
To begin – and as a prerequisite – an admin user (owner or member with edit rights) must generate the relevant provisioning code within the Jabra Plus Management platform.
Before you begin with provisioning, it is important that you meet the following prerequisites:
- An admin user in Jabra Plus Management must obtain the organization´s 12-digit organization provisioning code or room provisioning code to generate it
- Have a computer with an active Ethernet or Wi-Fi Internet connection
Note
Provisioning codes are valid for 14 days from the day they are generated by an admin user (owners or members with edit rights).
If you get a Code has expired error message, ensure you obtain a new provisioning code before continuing.
You must then download, install, and run the Jabra Plus Provisioning app on the provisioning computer (running Windows 10 or later), which connects via USB to the PanaCast 50 BYOD. You must also plug in the Ethernet cable from your PanaCast 50 BYOD to the organization´s router or network port.
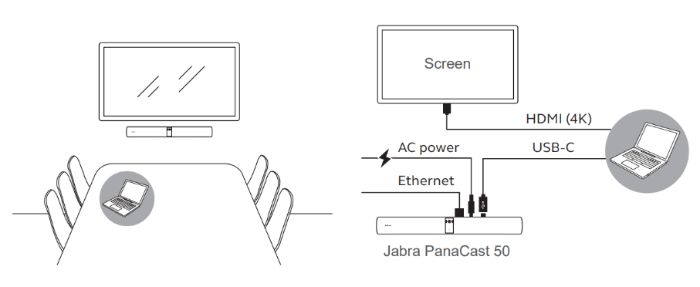
The illustration represents a suggested connection option.
Important note
During provisioning you may be asked to update the firmware of your PanaCast 50 BYOD. You can do so from within the Jabra Plus Provisioning app. This is a mandatory requirement, and the meeting room device is unavailable during the update.
During the update process, ensure you keep the PanaCast 50 BYOD connected and the Jabra Plus Provisioning app open. If you are unsure about firmware updating, contact an admin user in the organization.
If you experience any issues during the firmware update, see the Troubleshooting section.
Provisioning PanaCast 50 BYOD to Jabra Plus Management#
To provision a PanaCast 50 BYOD:
Launch the Jabra Plus Provisioning app on the computer you are using to provision Jabra meeting room devices (provisioning computer). Ensure you have Windows® administrator-level or equivalent rights to install software on the provisioning computer.
If the PanaCast 50 BYOD is plugged into a power supply, the USB-C cable from the PanaCast 50 BYOD is connected to the provisioning computer, and the provisioning computer has an active internet connection, Jabra Plus Provisioning automatically detects the PanaCast 50 BYOD meeting room device upon launch.
Jabra Plus Provisioning checks for a compatible and updated firmware version for your PanaCast 50 BYOD. If the firmware is outdated, the application prompts you to update before continuing. If so, click the Update button. This is a mandatory step.
Ensure that you keep Jabra Plus Provisioning open during the firmware update process. In the case that you experience issues, see the Troubleshooting section. If you already have the latest or compatible firmware installed, continue with the next step.
In the Enter Provisioning Code screen, enter either the 12-digit alphanumeric organization or room provisioning code that you or the admin user obtained from the Jabra Plus Management platform
At this point, Jabra Plus Provisioning, searches the network for your organization. When it finds it, you can see the message Organization found. To connect and continue, click Link to organization.
If you entered the organization provisioning code in step three, you must manually enter the name of the meeting room:
A. In the Enter the name of the meeting room screen, enter the name of the meeting room where the PanaCast 50 BYOD meeting room device is to be located. For example, Room 100. Click Next.
Tip
The name you give to the meeting room is also the name of the Jabra device (i.e.: PanaCast 50 BYOD) and the name appears in the organization´s room inventory in the platform, as an unassigned room.
Therefore, it is useful to know the naming conventions of the physical rooms in your organization, for example, Meeting Room 1 or Conference room B, and you do not have to change them later in the platform.
B. Otherwise, if you entered a room provisioning code in step three, the name of the meeting room is displayed automatically, as it was predetermined by an admin user in the platform
- In the Device linked to meeting room screen, click Next
- In the Set time zone for device screen, in the Time zone drop down menu, select the relevant time zone, and to save and continue, click Save
- If necessary, to change the network time protocol (NTP) server URL, in the NTP server field, click Edit to change the NTP server URL and when you are finished click Continue, and to confirm, click Save
- In the Date and time screen, you can see the time based on the provisioning computer running the Jabra Plus Provisioning app. To change the time zone, click Change, otherwise click Next.
At this point, you must continue configuring the network settings of the PanaCast 50 BYOD.
Network settings configuration
- In the Network configuration screen, select either Wi-Fi or Ethernet and click Configure
- Configure Wi-Fi or Ethernet as follows:
A. Wi-Fi:
- In the Network configuration screen, select the relevant Wi-Fi network, security settings, and if necessary, enter the relevant password, and then click Confirm
B. Ethernet:
- In the Authentication protocol screen, select the EAP protocol for your network i.e. Certificates, Credentials or None (no authentication protocol) and then click Next
In the Certificate Signing Request screen, you can either click Download File to download the certificate as a *.csr file, get it signed and upload the signed certificate to Jabra Plus Provisioning, or you can Copy to clipboard to copy the certificate text, and then you must paste it onto a text editor, save it in one of the supported file extensions or formats, get it signed and then imported or uploaded to Jabra Plus Provisioning. When you are finished click Next.
(Optional) If required, you can upload a file from a certificate authority. To do this, toggle the switch for Root certificate for authentication server, and you can either import and upload the signed root certificate file, or paste the signed certificate from your clipboard. Be aware that you can re-use the root certificate file to provision other PanaCast 50 BYOD on the same network.
For credentials: In the Network authentication screen, in the Username and Password fields, enter the relevant network credentials and click Connect
None (no authentication): Click Next and if there is an active Internet connection, Jabra Plus Provisioning enrolls or adds your PanaCast 50 BYOD to the platform’s room inventory
- In the Proxy server configuration screen, if your organization requires a proxy server, click Yes, and continue with the following steps a-d. Otherwise, click No and continue to step 4.
a. If you click Yes, in the Proxy type drop-down menu, select the relevant proxy type
b. In the Server Address field, enter the relevant server URL
c. In the Port number field, enter the relevant port number
d. (Optional) In the User name and Password fields, enter the username and password credentials used to access websites and online services through a proxy server
Tip
To save the proxy server configuration choices in the Jabra Plus Provisioning app for the next room you may provision, check the Save details for next room checkbox.
This way, when you provision another PanaCast 50 BYOD, the proxy server details are already filled out. To do this, in the Proxy server configuration screen, toggle the Use saved information switch.
At this point, in the Connecting to Jabra Plus Management screen, if the connection is successful, the application shows a Device provisioned screen summarizing what you have achieved during provisioning such as network name, IP address, firmware version of the Jabra meeting room device, and the name of the organization you have provisioned the device to.
- To finish provisioning, click OK. Your meeting room device is now provisioned to the Jabra Plus Management platform and appears in the room inventory.
After provisioning the Jabra meeting room device(s), see End of device provisioning – Next steps in Jabra Plus Management platform.
Jabra PanaCast 50 RS#
When you provision a PanaCast 50 Room System (RS) to the platform, the video bar automatically uses the correct video provider, when needed, i.e.: either Microsoft Teams Rooms (MTR) or Zoom Rooms (ZR).
To begin, an admin user in the platform must generate and download a room client, an *.msi file that is exclusive to the organization. This software client must be installed on the meeting room computer (ThinkSmart™ Core) bundled with the PanaCast 50 RS, which links or connects the meeting room device to the platform.
Before starting the provisioning procedure, you must obtain the room client from an admin user. For optional installation parameters or mass deployment options, read the Software client installation & device provisioning chapter.
After provisioning, the PanaCast 50 RS appears in the room inventory as a room, with the same name as the meeting room computer.
Note
It is recommended that you rename the meeting room computer in Windows before provisioning, to match the physical room name where the PanaCast 50 RS is located.
You can also rename the room in the platform after provisioning.
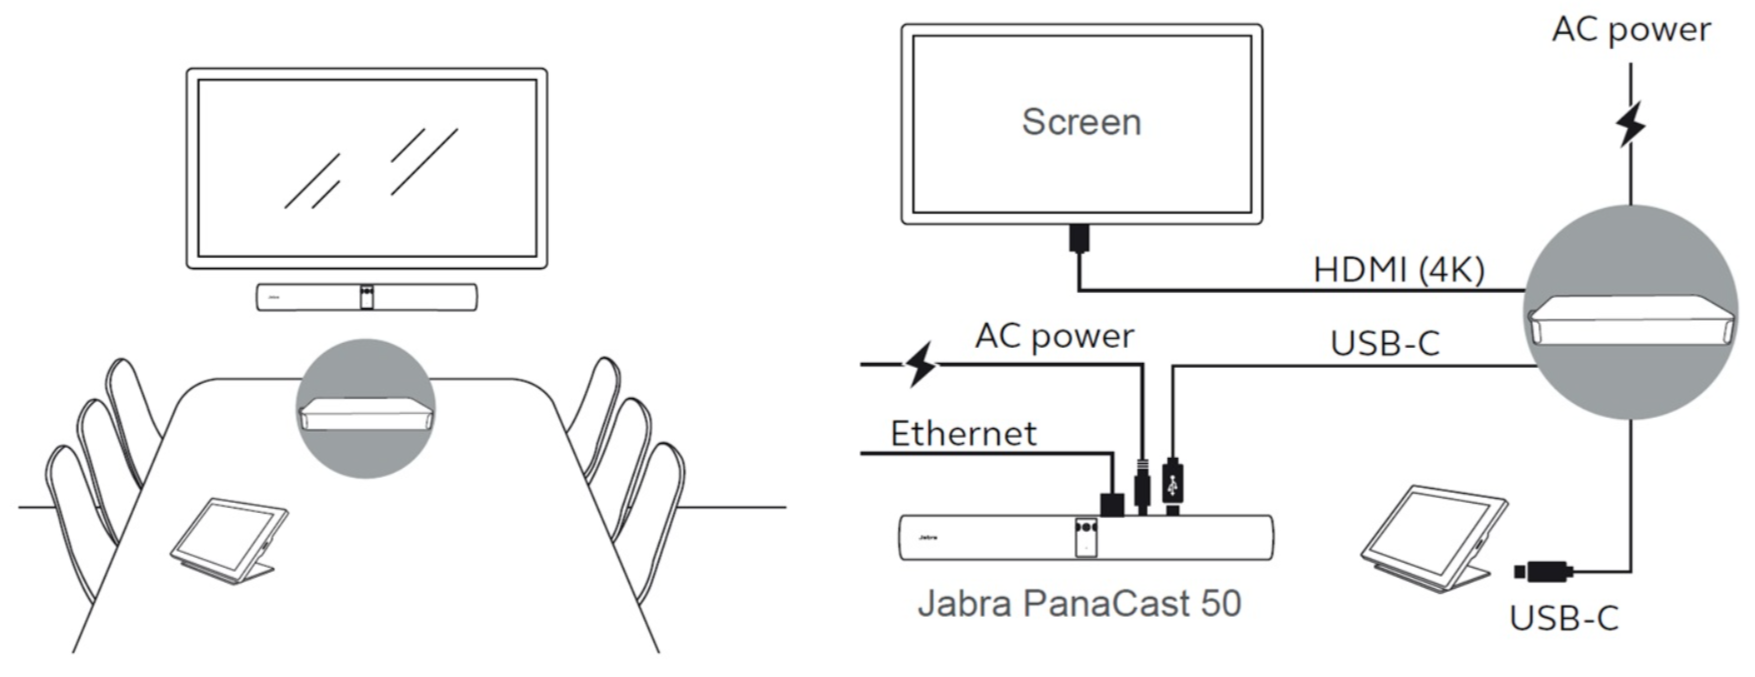
The illustration represents a suggested connection option.
Provisioning PanaCast 50 RS to Jabra Plus Management#
To provision the PanaCast 50 RS:
Install the room client and restart the meeting room computer after installation.
After restarting, the PanaCast 50 RS is added to the room inventory in the Jabra Plus Management platform and is automatically assigned the default standard room configuration.
After provisioning the Jabra meeting room device(s), see End of device provisioning – Next steps in Jabra Plus Management platform.
Jabra Scheduler#
The Jabra Scheduler is a room scheduling panel that can be provisioned to Jabra Plus Management and has a built-in client.
To connect or link the Jabra Scheduler to the platform, an admin user (owner or member with edit rights) must first generate the room provisioning code within the platform, as this code is used to add the device to a predetermined room in the organization.
Provisioning Jabra Scheduler to Jabra Plus Management#
To do this:
Power on the Jabra Scheduler
Select the interface language, and then tap Next. Ensure you accept the Privacy policy and License agreement
On the Select the device type for the touch controller screen, you must tap Jabra Scheduler, and then tap Next. At this point, the Jabra Scheduler checks your Internet connection.
On the Network established screen, tap Next
- Otherwise, if you must configure your network or Wi-Fi access, after the initial Jabra splash screen, tap Ethernet settings or Wi-Fi settings and change settings as desired.
A. Wi-Fi:
- On the lower right-hand side of the screen, tap Wi-Fi settings and enter your Wi-Fi network’s credentials, and then tap Next
B. Ethernet:
- Ensure the ethernet cable is plugged in on your Jabra Scheduler, and on the lower right-hand side of the screen, tap Ethernet settings
On the Date and time screen, to change the time, tap Change , otherwise tap Next
In the Link with organization in Jabra Plus Management screen, tap Start
In the Enter provisioning code screen, enter the 12-digit alphanumeric room provisioning code. At this point, the system looks for your organization, and when it finds it, tap Confirm
In the Select room type screen, tap to select the desired video service provider (MTR or ZR), and then tap Next
- Depending on your choice of video service provider i.e.: MTR or ZR, you may be asked to provide a pairing code to link or connect the video service provider to the Jabra Scheduler. To do this, ensure you follow the on-screen instructions. Ensure that you also choose the same video service provider that is used within the organization or the Jabra meeting room device in the room, if there is one.
At this point, the Jabra Scheduler is added to the predetermined room in Jabra Plus Management, in the room inventory menu item.
End of device provisioning – Next steps in Jabra Plus Management#
Be aware that after adding or provisioning any Jabra meeting room, personal devices or peripherals (e.g.: Jabra Scheduler) to the platform, you can find them in the organization’s device inventory or room inventory respectively and are ready to be managed by an admin user.
For both meeting room and personal devices, it is recommended to continue reading the Walkthrough: Suggested configuration of Jabra Plus Management platform chapter in the Jabra Plus Management platform guide, which provides the foundation for understanding its capabilities as well as remote management guidance.
At this point, an admin user can begin remotely managing Jabra devices from Jabra Plus Management.