All procedures in this chapter are mandatory unless stated otherwise.
Step 1
To quickly get started with the platform, you must perform both procedures in the following order:
a. Creating a Jabra Plus account
After creating an account, you must log in and you are prompted to create an organization (such as a business or corporation), which is a representation of the company/business on the platform.
When creating an organization, data tracking and data collection are enabled by default. Although you can disable data collection at a later time, it is recommended that you review and decide on the data collection settings before provisioning Jabra devices to the platform.
After creating the organization, you become the owner (of the organization) and can then choose how to grant access to subsequent admin users.
Note
After creating the organization, the admin user’s (owner) account cannot be deleted. This is because there must always be one admin user that has access to the organization, i.e.: an admin user that can manually log in using their email address.
Step 2 (Optional)
After creating an account and an organization, you can enable single sign-on (SSO), invite additional admin users manually in Jabra Plus Management, or use a combination of both depending on the SSO option used. If you do not wish to do so, you may continue to End of QSG – Next steps.
a. Choosing a single sign-on option
b. Inviting additional admin users
Only owners and members with edit rights in the Jabra Plus Management platform can download organization-specific software clients, manage Jabra devices remotely, set the settings for one or a group of Jabra devices, manage the firmware, and more. For conceptual information on the different components of the platform, read the managing the platform chapter.
Creating an account and choosing your interface language#
In the Jabra Plus Management platform, you must first create a Jabra Plus account and choose the interface language.
Note
When creating a Jabra Plus account, the default interface language is initially based on your browser settings.
Choosing an interface language on the platform only applies to your Jabra Plus account. Subsequent admin users can change their own interface language when they initially log in, or they can change the interface language following the changing the Jabra Plus Management platform interface language procedure in the appendix.
To create an account and choose the interface language:
- In a web browser, enter the following URL: https://cloud.jabra.com
- In the Log in to Jabra Plus Management pane, click Create account
- On the Jabra Login page, click Sign up now
- On the Create Account page, enter your business email address, and click Send verification code
- At this point, you receive a confirmation email with a verification code. Ensure you copy the verification code, and then return to https://cloud.jabra.com
- On the Create Account page, ensure you enter the code, click Verify code and then click Continue on the next screen
- On the Create Account page, you must choose your Country / Region and on the Display name field you must enter a name or alias, as this is your username on the platform. Ensure you also create a password following the guidelines, accept the Terms of Service and then click Next
- Once you log in to the platform, in the Welcome to Jabra Plus Management dialog, in the Language preference for personal account drop-down menu, choose your language and click Create organization
After your initial sign-in to the platform, the owner is prompted to create an organization.
Creating an organization#
After you complete the sign-up (first-time registration) process for an account and log in to the platform with your email domain, you, the admin user (now the owner), are prompted to create an organization, for example, ABC Company.
For conceptual information and guidance, see the Organizations topic.
To create an organization upon first-time login:
- In the Create organization dialog, in the Name field, enter a name for your organization. Ensure you provide a meaningful name, as there may be a need to invite additional admin users to the organization
Note
The platform supports ASCII and non-ASCII characters, such as accented letters, non-Latin alphabets, and symbols, however an organization cannot be renamed, so ensure the naming of the organization is correct.
- In the Type dropdown menu, select the level of access and click Continue
- In the Welcome dialog, ensure you read the license agreement and privacy policy and then click Accept
- In the Choose device information to collect dialog, check the relevant checkboxes, and to save your selections, click Continue. For more information about data collected, see the disabling data collection topic in the appendix
- In the Organization created dialog, click Get started. You are now the owner of the organization you created and are directed to the Dashboard
At this point, you can enable SSO to grant additional admin users’ access to the organization. Otherwise, if SSO is disabled, you can follow the inviting additional admin users procedure.
Choosing a single sign-on option#
An organization owner can enable single sign-on (SSO) to control how admin users access the platform. Depending on the selected SSO option, access to the organization is controlled by the configured identity provider, approved domain(s), and/or manual invitations.
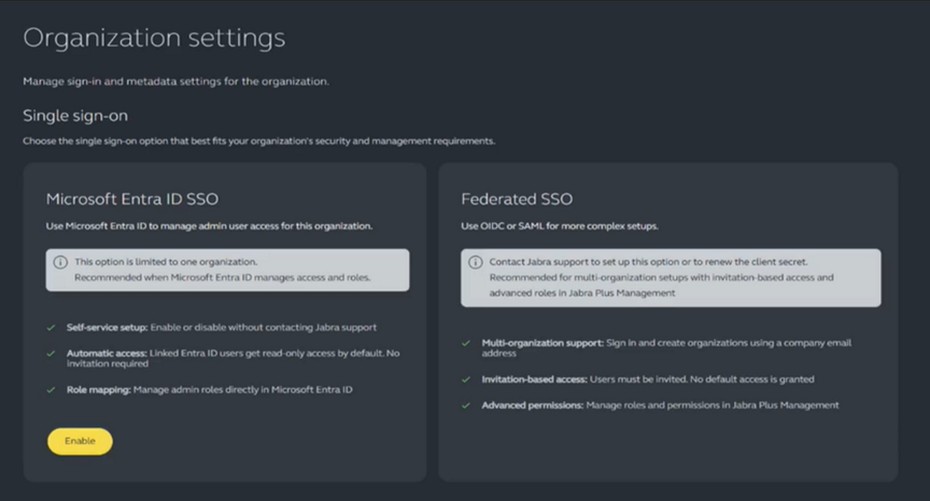
Jabra Plus Management provides two SSO options on the Organization settings page:
- Microsoft® Entra ID SSO
- Federated SSO
On the one hand, you can use Microsoft® Entra ID SSO if you have one organization and want a self-service setup in which Microsoft® Entra ID manages access and roles.
When Microsoft® Entra ID SSO is enabled, all admin users authenticate using Microsoft® Entra ID and can only access one organization. By default, all admin users are given read-only access. Further access rights i.e.: granting owner or edit permissions for meeting rooms and/or personal devices are assigned exclusively in Microsoft® Entra ID.
Also, when Microsoft® Entra ID SSO is enabled, certain functionalities are not available in Jabra Plus Management, for example, admin users cannot edit permissions, change their Jabra Plus profile or leave an organization on their own. Additionally, for meeting rooms, location-based access control is managed via the Admin users menu in Jabra Plus Management. For procedures, see Location-based access control.
Important note
When Microsoft® Entra ID SSO is enabled, there must always be at least one admin user that can access the platform using email and password.
This requirement does not apply to Federated SSO.
On the other hand, use Federated SSO if a more complex setup is required, for example, access across multiple organizations, invitation-based access, SAML, or an identity provider other than Microsoft® Entra ID. Federated SSO supports OpenID Connect (OIDC) and Security Assertion Markup Language (SAML), however it requires Jabra assistance and can take longer to set up than self-service Microsoft® Entra ID SSO.
Note
SAML is available through Federated SSO only. There is no self-service SAML setup in Jabra Plus Management.
When you use Federated SSO (or when SSO is not used at all), an owner must invite additional admin users manually in Jabra Plus Management as no default access is granted, and roles and permissions are managed exclusively within the platform.
Be aware that for Federated SSO, the organization owner must work with the identity provider administrator and Jabra to complete the setup. Jabra provides the Jabra-side federation values required to register the application or trust relationship with the identity provider, and the organization owner must provide the corresponding identity provider information and credentials.
To avoid delays, ensure the organization owner provides the following federation information to Jabra:
- Company name
- Organization name
- Federation type
- Identity provider type
- Supported email domain(s)
For OIDC, organization owner must provide the following to Jabra:
- OpenID discovery endpoint
- ClientID
- Groups endpoint, if required
- Client Secret
- Expiration date The Groups endpoint is optional only if the ID token already contains end-user groups, otherwise, the organization owner must provide it to Jabra.
For SAML, the organization owner must provide the following to Jabra:
- Partner Entity, i.e.: App Federation Metadata URL
- Domain names
- Certificate
- Certificate password
- Expiration date
Important note
Sensitive federation credentials, such as a Client Secret, certificate, or certificate password, must be sent by encrypted email or another secure channel agreed with Jabra.
Moreover, if the federation credential or configuration later changes, such as a new Client Secret, certificate, metadata, ClientID, supported domain, or expiration date, contact a Jabra representative before the existing credential expires.
For the procedure, see Updating Federated SSO credentials in the appendix of this guide. Otherwise, admin users risk losing access to the platform. For guidance regarding roles and permissions, see the Roles and permissions topic.
Enabling single sign-on#
There are two options to enable SSO. One with Microsoft Entra ID® and another using federated SSO. If you do not want to use SSO, continue to the procedure for inviting additional admin users.
Otherwise, continue with either the Microsoft® Entra ID SSO procedure or the Federated SSO procedure that follows.
To enable Microsoft® Entra ID SSO:
- Log in to Jabra Plus Management with an account that has the owner role
- On the left-hand navigation bar, click the name of your organization
- On the Organization settings page, in the Microsoft® Entra ID SSO pane, click Enable
- In the Sign in to SSO provider dialog, click Sign in
- Sign in to Microsoft® Entra, and then verify and accept the permissions requested
Important note
- Admin mode: To enable Microsoft Entra ID to be used with the platform – on Step 5 of this procedure – you must log in to Microsoft® Entra with a Microsoft Entra ID admin user account holding the Application Administrator role, and you must also check the Consent on behalf of your organization checkbox, allowing all users in your organization to get access to the relevant resources. Doing so creates the Enterprise Application in Microsoft® Entra, granting consent to Jabra Plus Management and letting you assign and manage user access to enterprise applications.
- Non-admin users requesting consent: If you are not a Microsoft Entra ID admin user, you must request consent from one. However, to do this, the Admin consent requests option in Microsoft Entra ID must be enabled. When the non-admin is granted consent by the relevant Microsoft Entra ID admin user in your business organization, you must sign in again to enable SSO.
- In the Jabra Plus Management platform, in the Single sign-on enabled dialog, click OK
At this point you can return to Microsoft® Entra and grant additional admin users’ access to the platform. For details on the scope of roles, refer to the Roles and permissions topic.
After enabling Microsoft® Entra ID SSO, the admin user can continue with the End of QSG – Next Steps.
To request Federated SSO:
Important note
Due to the exchange of sensitive information, ensure that when providing Jabra with the information required to request Federated SSO, you send an encrypted email. See the following procedure to do this from Microsoft Outlook.
- Contact Jabra to request Federated SSO, and provide the following information:
- Company name
- Organization name
- Organization ID
- Federation type
- Identity provider type
- Supported email domain(s) a. If your organization would like to use OIDC, ensure you provide Jabra with the following:
- OpenID discovery endpoint
- ClientID
- Groups endpoint, if required b. If your organization would like to use SAML, ensure you provide Jabra with the following:
- Partner Entity, i.e.: the URL of the SAML metadata XML document
- Domain names
- When requested by Jabra on a follow up email, provide the required federation credential:
- For OIDC: Client Secret and expiration date
- For SAML: certificate, certificate password, and expiration date
- At this point, a Jabra representative sends an email confirming that Federated SSO is enabled. To verify access, ensure you sign in to Jabra Plus Management, and on the left-hand navigation bar, click the name of your organization, and then click Admin users
- On the Admin users page, on the list of Admin users, confirm that the Login type column displays either SSO-SAML or SSO-OIDC
To conclude, you must manually invite additional admin users to grant access to your organization and assign their roles in Jabra Plus Management. See the Inviting additional admin users (for Federated SSO and non-SSO access) procedure.
Inviting additional admin users (for Federated SSO and non-SSO access)#
When Federated SSO is used, or when SSO is not used, an owner must invite additional admin users manually in Jabra Plus Management to grant them access to an organization. Invited admin users can be assigned as additional owners or as members with either edit rights or read-only rights. For guidance regarding roles and permissions, see the Roles and permissions topic.
Adding a second owner to an organization is recommended, as it can be helpful if access to the platform is lost. Only an owner can invite a new admin user, send, resend or revoke invitations, and edit permissions on behalf of all admin users in the organization.
When admin user access is managed in Jabra Plus Management, an owner must perform user management within the platform. For procedures, refer to the Changing roles and editing permissions of admin users (for Federated SSO and non-SSO access) and Removing an admin user topics.
An owner can invite one or multiple admin users, and invitations are valid for seven days.
To invite one or more admin users to the organization:
- On the bottom left-hand side of the navigation bar, click the name of the organization you are currently the owner of, and then click Admin users
- On the Admin users page, on the top right-hand side of the screen, click Invite new user
- In the Invite new user dialog, in the Email field, enter the new admin user’s business email address
- To invite multiple members with the same permissions or additional owners, separate the email addresses with a comma (,) or semicolon (;)
- In the Role section, click the relevant radio button for Member or Owner
- When selecting the Member role, in the Permissions section, for Meeting rooms and/or Personal devices management, click Edit or Read only
- Click Invite
At this point, Jabra Plus Management sends an invitation email to the recipient. After accepting the invitation, the added admin user can sign in to the platform using either Federated SSO or their email address and password, depending on how access is configured for their account.
You can now continue to the End of QSG – Next Steps.
End of QSG – Next Steps#
You are now the owner of an organization, and you may or may not have invited additional admin users to the platform.
The next step is to provision Jabra devices to the newly created organization. For procedures you can refer to the Device Provisioning & Onboarding Guide.
When you have finished provisioning Jabra devices to the platform, you can continue to the Suggested configuration of the Jabra Plus Management platform topic to begin configuring it.
Device provisioning methods and strategies
To add Jabra devices to the platform – and depending on your type of Jabra device, the admin user can perform the software client installation, generate an organization provisioning code/room provisioning code and/or download the Jabra Plus Provisioning app.
You can also delegate the provisioning to an AV Installer or third-party. For example, depending on the Jabra device, an admin user with the relevant permissions must provide the third-party with the software client(s) and/or the desired provisioning code type.
If you would like to provision Jabra meeting room devices to the platform, or delegate provisioning to an AV Installer, you must decide on the strategy:
- Organization provisioning code lets you add the device to the platform and to your organization to an empty location first and then add a configuration and/or a firmware policy manually. This approach works if you want to focus on provisioning all devices first and you do not have a Locations/Room structure in place.
- Room provisioning code can be used when you create a Locations/Room structure first which can include a configuration and/or firmware policy, and you then provision Jabra device(s) directly to that specific room. See the Provisioning Codes topic for guidance and procedures.
The following table outlines the types of Jabra devices and their respective provisioning method.
| Type of Jabra device | Required provisioning method | Pre-requisite step performed by an admin user |
|---|---|---|
| Jabra personal devices (e.g. Evolve3 85, Engage 50, etc.)1 Note: Includes Jabra speakerphones (e.g., Speak2 75, etc.) | Jabra Plus Desktop app2 | Create and download Jabra Plus Desktop |
| Jabra meeting room device Jabra PanaCast 50 Room System (RS)3 | Room client2 | Create and download a room client |
| Jabra meeting room device Jabra PanaCast U30 or Jabra PanaCast 40/50/55 Video Bar System (VBS) | An Organization or Room provisioning code | Viewing or generating a room or organization provisioning code |
| Jabra meeting room device Jabra PanaCast 50 — Bring Your Own Device (BYOD) | Jabra Plus Provisioning app and an Organization or Room provisioning code | Download Jabra Plus Provisioning and Viewing or generating a room or organization provisioning code |
1 Includes Jabra speakerphones (e.g.: Speak2 75, etc.).
2 Mass deployment option: An admin user or AV Installer can perform the software client installation in a mass deployment context. For guidance, see Mass deployment in the Software client installation & device provisioning topic in the Jabra Plus Device Provisioning & Onboarding Guide.
3 Includes any certified Microsoft Teams Rooms (MTR) or Zoom Rooms (ZR) meeting room computer (Windows PC with a screen/interface) that is permanently connected to the Jabra PanaCast 50.